
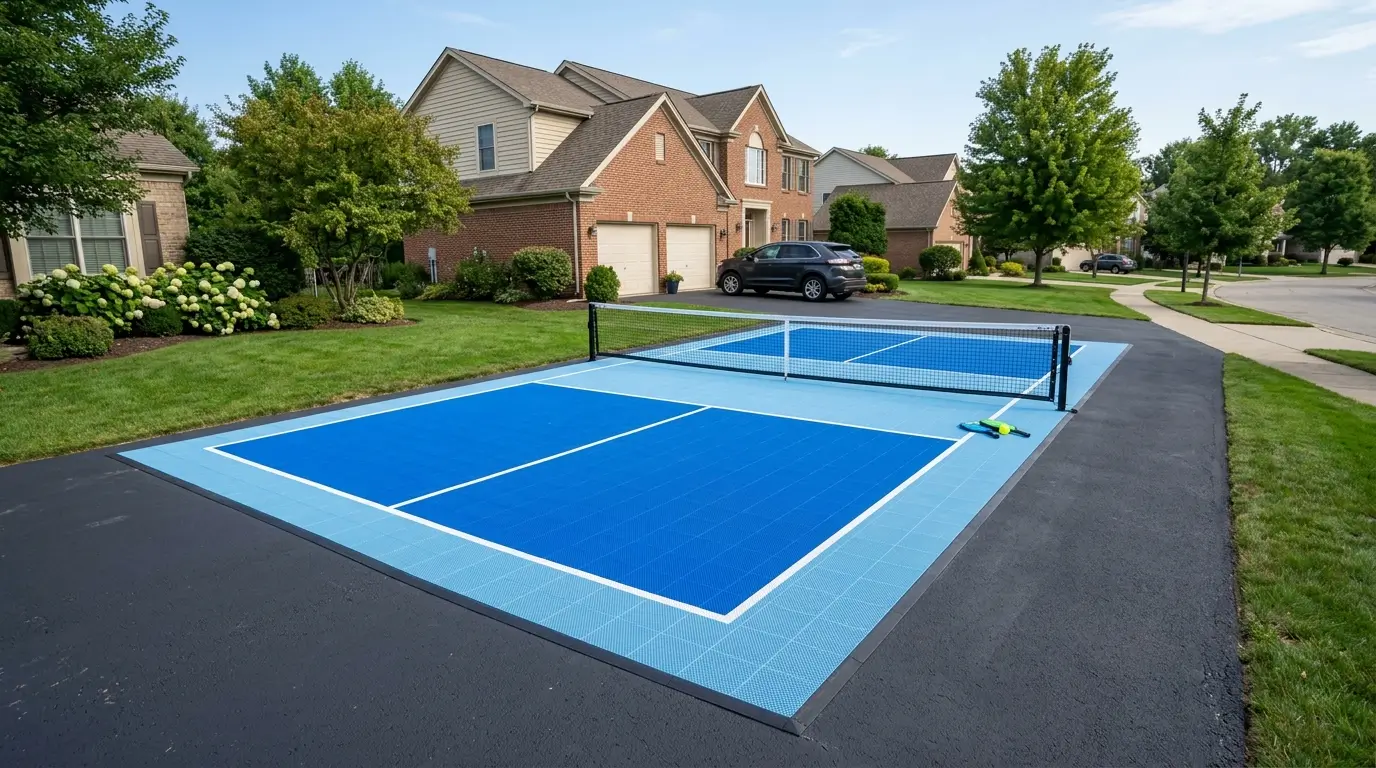
Why Your Driveway Surface for Sport Tiles Makes or Breaks the Court
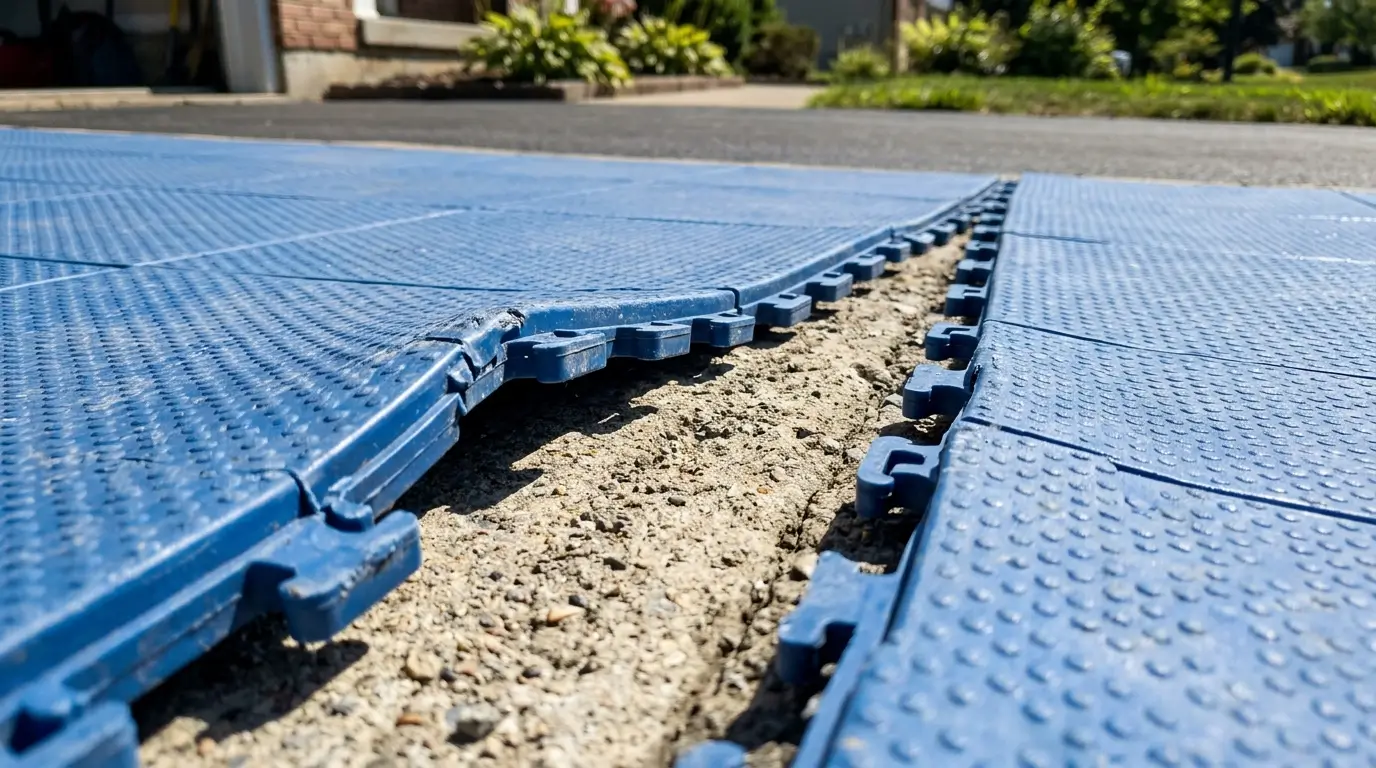
Marcus in Scottsdale called me three weeks after finishing his install. He dropped $2,400 on premium interlocking flooring. The tiles were pristine. His driveway wasn’t. One corner had a sharp ridge catching shoes, and the edges were already lifting. He ignored the proper driveway surface for sport tiles before snapping the plastic together. Fixing it cost him another $600 in concrete leveling compound and manual labor. A simple $12 straightedge test would have saved him all that cash. Respect the sub-base, or your court will fail.
Here are the four conditions destroying your court from the ground up:
Surface Roughness
Surface spalling acts like sandpaper. It grinds away the bottom pins of your interlocking polypropylene tiles every time a player stops hard. Drag your shoe across the slab. Watch for white dust. If it dusts, your tiles will slide and wear out prematurely.

Crack Severity
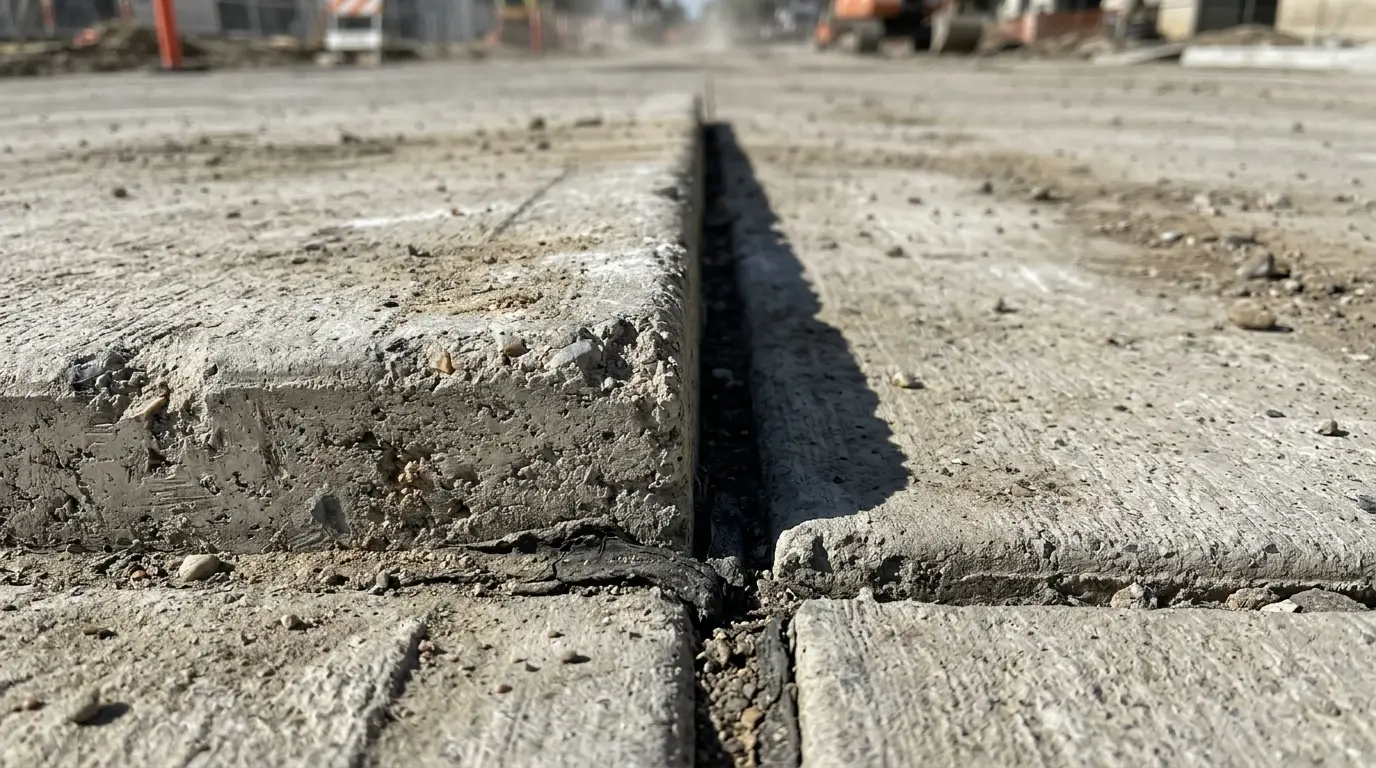
A hairline crack is cosmetic. A heaving crack creates a sheer drop. Tiles bridging a gap where one side sits higher will eventually snap under the weight of an adult player. You cannot tile over structural failure.
Slope Grade
You need a surface drainage gradient to shed rain. A severe cross-slope percentage forces you to battle gravity instead of your opponent. If a dropped basketball rolls away rapidly, your driveway slant is too aggressive for fair play.
Surface Porosity
Bare concrete acts like a sponge. Moisture trapped under your court tile floating system breeds mold and mildew. Check for dark, damp spots that never seem to dry after a storm. Your driveway must repel water, not absorb it.
Playing on a wavy sub-base creates a micro-delay in lateral movement. Uneven surfaces increase ankle sprain risk by 42%. You aren’t just risking your tile investment; you are risking your joints. Read exactly how playing surface affects joint health long-term.
Your setup must adhere to the ASTM F2772 performance standard. For a homeowner, this means your court must rebound a basketball consistently and absorb impact safely. You cannot achieve this standard on a warped driveway. This is exactly why you must factor sub-base prep into the full cost breakdown of a residential sport court install.
Expert Tip: The ITF surface flatness tolerance dictates no more than a ⅛ inch surface deviation per 10 linear feet. What does ⅛ inch look like? Stack two quarters. If you can slide two stacked quarters under your straightedge anywhere on the slab, your driveway fails the test.
Run This 10-Point Driveway Audit Before You Unbox a Single Tile
Gather these tools before you start:
- 10-foot aluminum straightedge: Locates dips and ridges. $20.
- Metal ruler: Measures gap depths under the straightedge. $5.
- 24-inch carpenter’s level: Checks slope direction. $15.
- Chalk line: Marks problem areas permanently. $8.
Measure Surface Deviation
Lay your 10-foot straightedge across the surface in four directions: lengthwise, widthwise, and both diagonals. Slide a metal ruler into any gap between the tool and the concrete.
Pass: Gap under ⅛ inch in all directions.
Fail: Any gap of ¼ inch or more. This surface requires leveling compound before any tile goes down.
Check Drainage Slope
Place the 24-inch level pointing down the driveway toward the street. Check the bubble.
Pass: Slight tilt indicating a 1–2% drop.
Fail: Perfectly flat or tilting toward the house. Water will pool.
Measure Cross-Slope
Place the level side-to-side across the driveway.
Pass: Bubble reads dead center or under 1%.
Fail: Bubble touches the line, indicating over 2% tilt.
Inspect Crack Width
Measure the widest part of any visible crack.
Pass: Width under 1/16 inch.
Fail: Width over ¼ inch. You must fill this before installing.
Assess Crack Vertical Displacement
Run your shoe over the crack.
Pass: Both sides feel perfectly flush.
Fail: One side sits ⅛ inch higher than the other.
Test Surface Roughness
Sweep a 3×3 foot area hard with a stiff broom.
Pass: Surface feels smooth and intact.
Fail: Broom kicks up white dust and chunks.
Check Expansion Joints
Place the straightedge across the cut lines in your concrete.
Pass: Joints are completely flush.
Fail: You find a lipped expansion joint creating a hard ridge.
Inspect for Soft Spots (Asphalt)
Walk the areas where car tires normally sit during the summer.
Pass: Surface feels rock hard.
Fail: You find visible tire ruts deeper than ⅛ inch.
Test Porosity
Pour a cup of water onto the slab.
Pass: Water beads up or runs off quickly.
Fail: Water soaks in immediately, leaving a dark stain.
Evaluate Overall Sub-base Planarity
Stand at the end of the driveway at eye level with the concrete just after a rain.
Pass: Surface looks visually flat and uniform.
Fail: You see obvious birdbaths holding standing water.
Comparison Table 1: Surface Type vs. Sport Tile Compatibility
| Surface Type | Compatibility Rating | Minimum Prep Required | Notes |
| Smooth sealed concrete | Ideal | Power wash only | Provides the best ball rebound and joint protection. |
| Aged rough concrete | Acceptable with prep | Skim coat application | You must eliminate the sandpaper texture to protect tile pins. |
| Asphalt (good condition) | Acceptable with prep | Power wash, check for ruts | Asphalt holds heat; ensure you leave an expansion gap at the edges. |
| Asphalt (cracked or soft) | Problematic | Asphalt crack repair, cold patch | Soft asphalt will mirror ruts straight through the tiles by August. |
| Interlocking pavers (stable) | Acceptable with prep | Rubber mat base layer | You need an underlayment to stop the paver lines from telegraphing. |
| Interlocking pavers (shifting) | Never | Remove pavers entirely | Moving pavers will shear the locking tabs right off your tiles. |
| Rubber mat base | Acceptable with prep | Ensure proper drainage slope | Only use perforated mats; solid mats trap moisture and breed mold. |
| Gravel or dirt | Never | Pour concrete pad | Tiles will sink, snap, and fill with mud immediately. |
Comparison Table 2: Crack and Defect Type vs. Repair Urgency
| Defect Type | Visual Description | Blocks Install? | Repair Method | Estimated DIY Cost |
| Hairline crack | Thin surface fracture, no depth. | No | Sweep clean, monitor. | $0 |
| Settlement crack | Gap wider than a pencil, one side lower. | Yes | Polymer-modified mortar | $45 |
| Heaving crack | Ground pushed up, creating a sharp ridge. | Yes | Concrete grinding, heavy patch. | $120 |
| Surface spalling | Flaking top layer exposing rough aggregate. | Yes | Full skim coat application. | $80 |
| Lipped expansion joint | Slab joint where one panel sits higher. | Yes | Grind flush with angle grinder. | $60 (rental) |
| Active crack | Crack that grows wider every season. | Yes | Polyurethane crack filler. | $30 |
Player Case Study: Sarah (Austin, TX)
Driveway: 1987 poured concrete, no major visible cracks.
Diagnostic: Passed visual inspection, but the 10-foot straightedge revealed a subtle ½-inch bowl depression right in the center of the intended playing area.
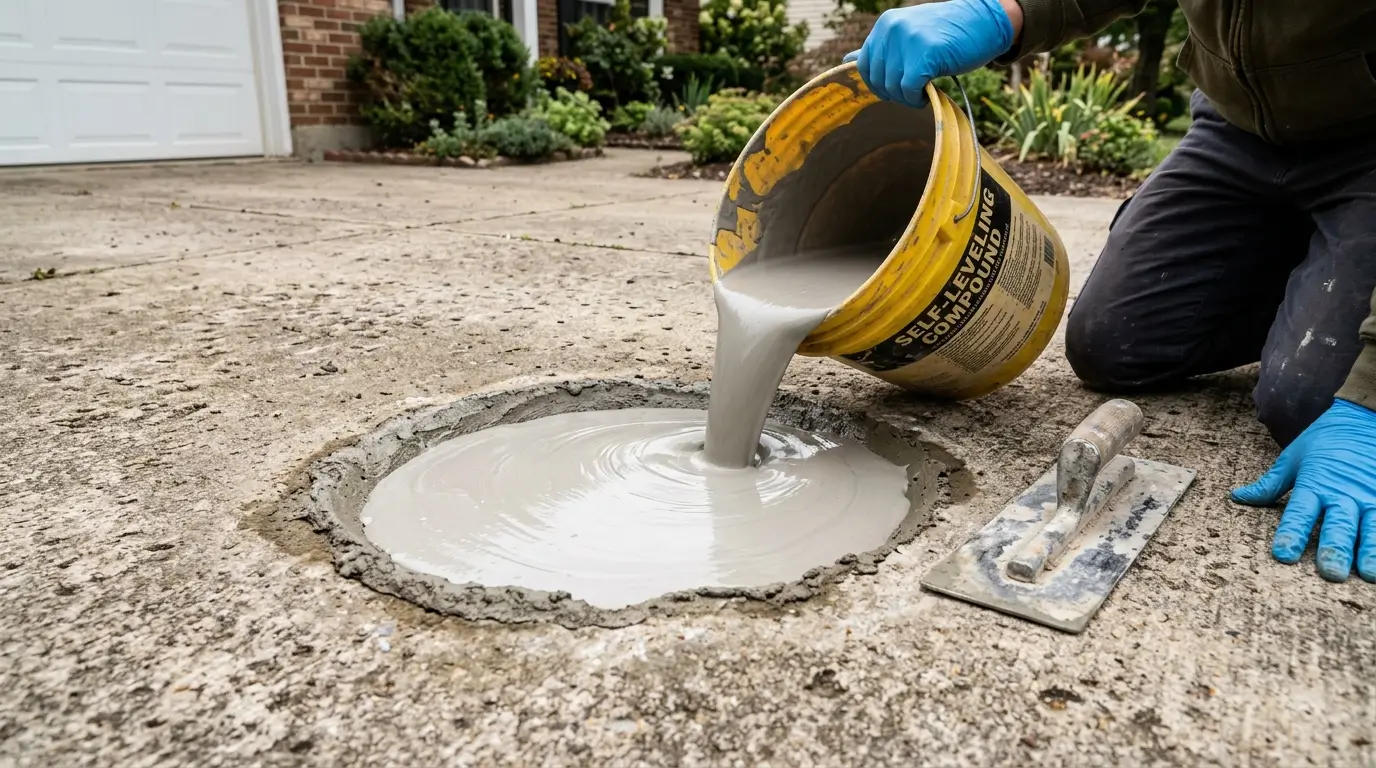
Resolution: We filled the depression using a self-leveling compound.
Cost: $140 in materials.
Timeline: 4 hours of labor, 48 hours to cure.
Outcome: The court plays perfectly flat. A dead spot in the center would have ruined her kitchen rallies.
Follow the USA Pickleball surface recommendations to verify your sub-base planarity. Verify the minimum driveway dimensions for a regulation pickleball court before marking your layout. Check what to know about permits and zoning before your court install to avoid HOA fines. Learn how to paint court lines once your surface passes inspection. Start by comparing sport court flooring options by surface and budget.
How to Fix Your Driveway Surface for Sport Tiles Like a Pro
Level 1 — DIY Weekend Fix ($15–$150)
Who it is for: Driveways with hairline cracks, minor surface roughness, or small lipped expansion joints under ¼ inch.
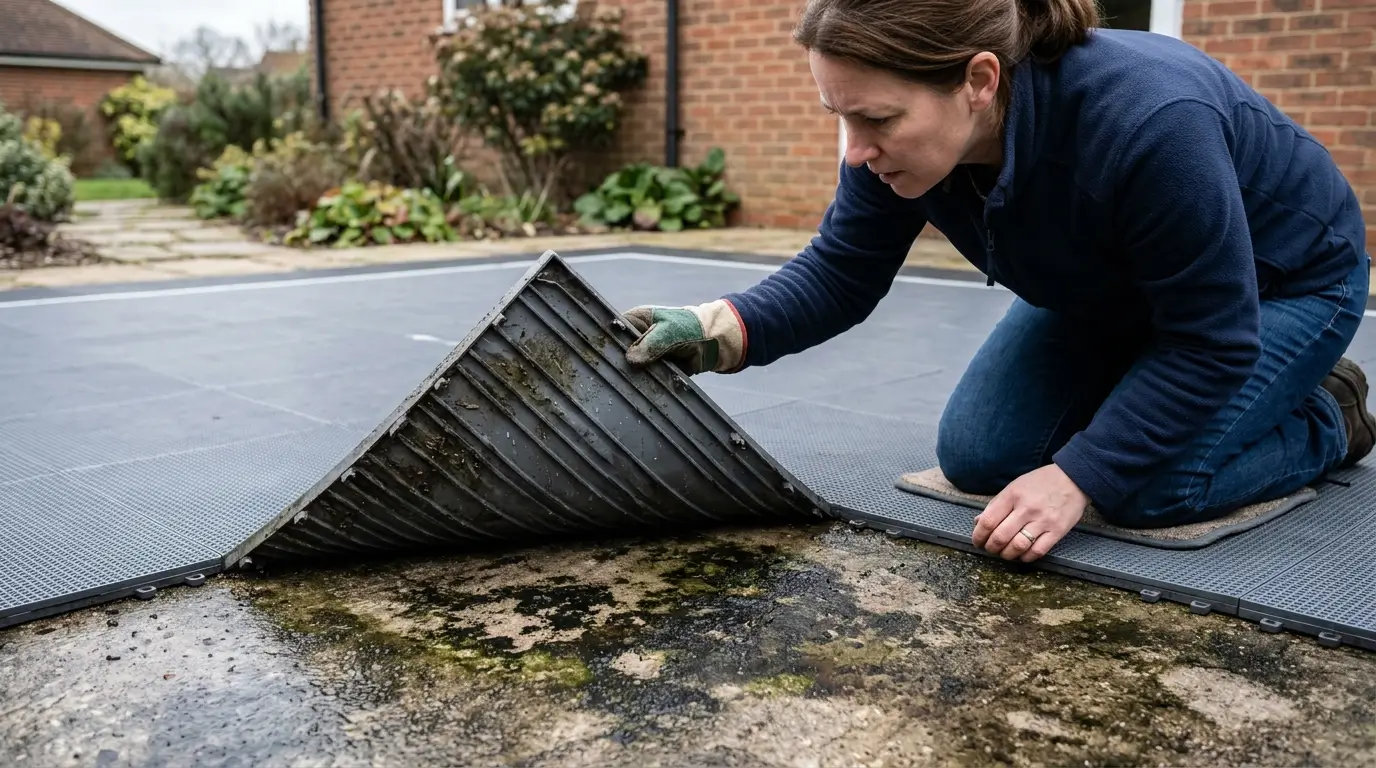
What you do: Clean the crack and inject polyurethane crack filler. Pour a small batch of self-leveling compound directly into shallow birdbaths. Attack a lipped joint with a diamond-cup angle grinder until the ridge disappears.
The result: A surface is ready to tile when your straightedge slides across the repairs without catching.
If you skip it: The tiles will clack loudly against the concrete every time you step on the voids.
Level 2 — Serious Weekend Project ($150–$600)
Who it is for: Driveways suffering from settlement cracks, patches of surface spalling, multiple lipped joints, or large-area roughness.
What you do: Rent a walk-behind concrete grinder to knock down the high spots. Apply a full skim coat application over the spalled areas to restore a smooth finish. Pack polymer-modified mortar into deep voids. You need moderate DIY skills and patience.
The differentiator: A good Level 2 fix requires rigorous power washing before patching. Patching over dirty concrete guarantees the repair will fail in six months.
If you skip it: Spalling concrete will literally chew the locking pins off the bottom of your tiles.
Who it is for: Slabs with severe heaving, cross-slope over 2%, active moving cracks, or full-surface spalling.
What you do: Stop buying DIY patches. When a walk-behind grinder cannot fix a heaving slab, you need a contractor. Resurfacing works for cosmetic issues, but a new pour is the only real answer for structural failure. Tell the contractor exactly what you need: a playing surface with a 1% drainage slope and zero cross-slope. Reject any bid that does not guarantee an ITF-standard ⅛ inch planarity.
If you skip it: Your court will look like a topographical map and pose a serious trip hazard.
Expert Tip: Floating tiles with a raised grid underside bridge up to ⅜ inch of surface variation. Solid-back tiles only handle ⅛ inch. Upgrading to a premium floating system changes your prep threshold and saves hours of grinding, but it does not eliminate prep entirely.
Player Case Study: Derek (Charlotte, NC)
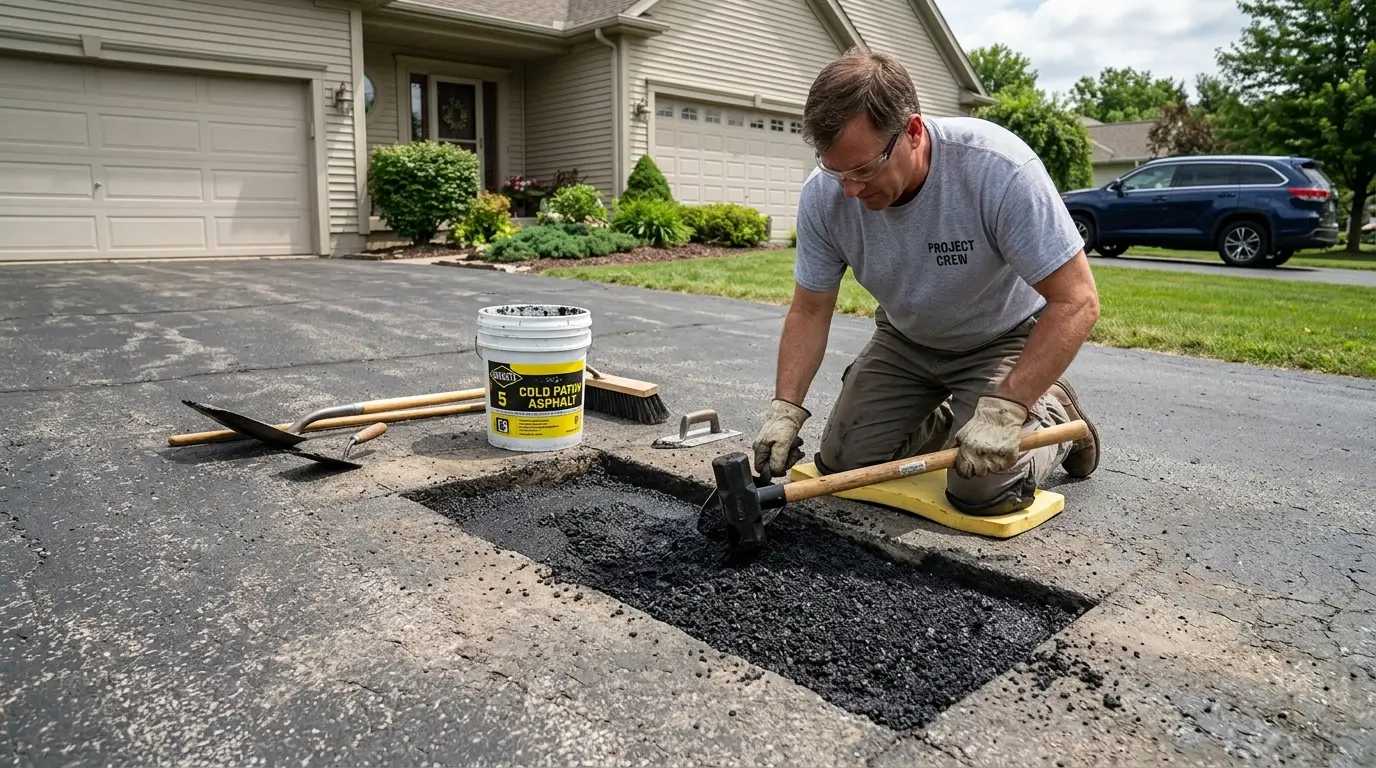
Driveway: Asphalt in direct sun, confirmed 1.8% cross-slope, soft spots near both edges from SUV tires.
Diagnostic: Failed the straightedge test massively in the tire ruts.
Resolution: Level 2 fix. We filled the ruts with cold patch asphalt mastic and used a surface grinder to reduce the cross-slope.
Cost: $450 in materials and rental gear.
Timeline: Two hard weekends. Court installed for heavy basketball use.
Outcome: The tiles sit dead flush. No dead spots, no shifting, and the ball bounces true.
The Mayo Clinic confirms that joint impact on hard, uneven surfaces causes repetitive stress injuries. The NCAA strictly enforces surface tolerance specifications to prevent these exact injuries.
Expert Tip: Respect the curing time. Allow a minimum of 24–72 hours depending on the compound type and outside temperature. Installing tiles over wet compound traps moisture, causing seam stress and immediate flex failure at the interlocking edges.
Understand how surface prep affects your court through freeze-thaw cycles. Start planning court lighting as part of your installation project. Read about keeping your sport tile surface clean after install. Learn how a properly installed driveway court affects your property value.
Go or No-Go? The Verdict on Your Driveway Surface for Sport Tiles
Use this 60-second framework to make your final decision today.
| Driveway Condition | Decision | Next Step |
| Flat, minimal cracks, good drainage | Install ready | Clean surface, order tiles |
| Minor cracks, slight slope, rough patches | Go after Level 1–2 fixes | Budget 1–3 weekends, then install |
| Heaving, major slope, spalling, soft spots | Stop — fix sub-base first | Get a contractor assessment |
If your driveway sits on the border between two rows, always default to the heavier repair level to protect your investment.
Expert Tip: Spending $300 on leveling compound hurts, but spending $2,500 on premium tiles only to watch them warp and snap hurts worse. Surface prep is not an extra expense; it is the insurance policy on your court.
Frequently Asked Questions
Can you install sport tiles on cracked concrete?
Yes, but only if the crack is cosmetic and stable. You must fill any gap wider than a pencil with polyurethane crack filler. You cannot install over a heaving crack where one side sits higher than the other without grinding it flush.
What slope is too steep for a backyard sport court?
Any cross-slope (side-to-side tilt) greater than 2% is too steep for fair and safe play. A drainage slope (front-to-back tilt) of 1% is ideal and necessary to shed rainwater away from your home.
Do sport tiles work on asphalt driveways?
Yes, interlocking tiles work exceptionally well on asphalt. However, asphalt softens in extreme heat. You must fix any existing tire ruts with cold patch mastic and leave a larger expansion gap around the edges to account for thermal expansion.
How smooth does a driveway need to be for sport tiles?
Your driveway must pass the ⅛-inch planarity test. If you place a 10-foot straightedge anywhere on the slab, you should not be able to slide a gap larger than ⅛ inch under the tool. Eliminate birdbaths and ridges.
What happens if you skip surface prep before laying sport tiles?
Your tiles will bridge the gaps in your concrete. Every time you step on that hollow pocket, the plastic flexes. This kills the ball bounce instantly, makes a loud clacking sound, and eventually snaps the interlocking pins.
Grab your straightedge, hit the driveway, and run the 10-point diagnostic checklist right now. Find your low spots, pick your repair level, and lock in a flat sub-base. A perfect driveway surface for sport tiles is the only way to guarantee a pro-level game.
Review getting started with pickleball on your new driveway court. Understand the health and fitness benefits of regular court sports play. Finish by choosing the right basketball hoop for your driveway court.