Walking onto your outdoor sport court and seeing raised, blistered spots is incredibly frustrating. If you are dealing with bubbles in an outdoor acrylic court surface, you are likely looking at trapped moisture, poor perimeter drainage, or aging coatings that have lost their adhesion to the asphalt or concrete slab. Do not panic.
In this guide, I will show you exactly how to identify the root cause of the problem. We will determine if a DIY repair is realistic for your situation or if it is time to call a professional. You will learn the step-by-step process to fix acrylic court bubbles safely, when full resurfacing is required, and how to protect your court from future blistering.
What Causes Bubbles in an Outdoor Acrylic Court Surface?
Bubbles in an acrylic court surface are primarily caused by trapped moisture or vapor pressure pushing up from under the concrete or asphalt slab.
When water infiltrates the base of your court, it sits beneath the pavement. As the sun beats down on the dark acrylic surface, the pavement heats up, and that trapped moisture turns into vapor. Because standard acrylic coatings are highly durable and seal the court, the vapor cannot easily escape. It pushes upward against the paint, stretching it until it separates from the asphalt, creating a bubble. This is known as hydrostatic pressure.
Several common issues lead to this moisture trapping:
Poor perimeter drainage: Clogged French drains or landscaping that slopes water toward the court slab.
Irrigation overspray: Lawn sprinklers constantly hitting the edge of the court.
Lack of a vapor barrier: Older concrete courts built without a proper plastic vapor barrier underneath the slab.
Aging coatings: As sport court surface delamination naturally occurs over 7 to 10 years, the paint loses its chemical grip on the asphalt.
Improper application: If a contractor applied a new layer of acrylic while the court was still damp from morning dew, moisture was trapped between the layers from day one.
You can learn more about how to manage these specific environmental factors by reviewing manufacturer guidelines for acrylic sport surface maintenance.
Are Bubbles in an Acrylic Sport Court Dangerous?
Yes, they are a significant safety hazard and a liability for facility managers.
From a playability standpoint, a bubble creates a severe dead spot. If a tennis ball or basketball hits the raised blister, the bounce will die or deflect wildly. More importantly, bubbles are tripping hazards.
If a player makes a hard lateral cut and steps directly onto a raised, hollow bubble, the acrylic will likely crack and cave in. This causes sudden loss of traction, leading to rolled ankles or slip-and-fall injuries. Furthermore, once a bubble pops or cracks, it creates a direct opening for rain to pour directly under the rest of the coating, accelerating the damage across the entire court.
Can You Fix Acrylic Court Bubbles Yourself?
You can fix small, isolated acrylic court bubbles yourself using basic scraping, patching, and painting techniques. However, widespread bubbling caused by severe subsurface moisture usually requires a professional contractor.
If you have two or three bubbles the size of a coin or a small dinner plate on an otherwise flawless court, a DIY patch job is highly effective and will save you money.
If your court is covered in dozens of tennis court surface blisters, or if the bubbles return in new spots immediately after every heavy rainstorm, DIY patching is a waste of time. Widespread bubbling signals a systemic drainage or structural failure beneath the pavement that requires heavy machinery and professional resurfacing.
Step-by-Step Guide: DIY Repair for Small Acrylic Court Bubbles
If you have determined that your issue is localized, here is how to execute a proper DIY acrylic court repair. Wait for a stretch of dry weather with temperatures consistently between 60°F and 80°F.
Step 1 – Inspect and Map the Affected Areas
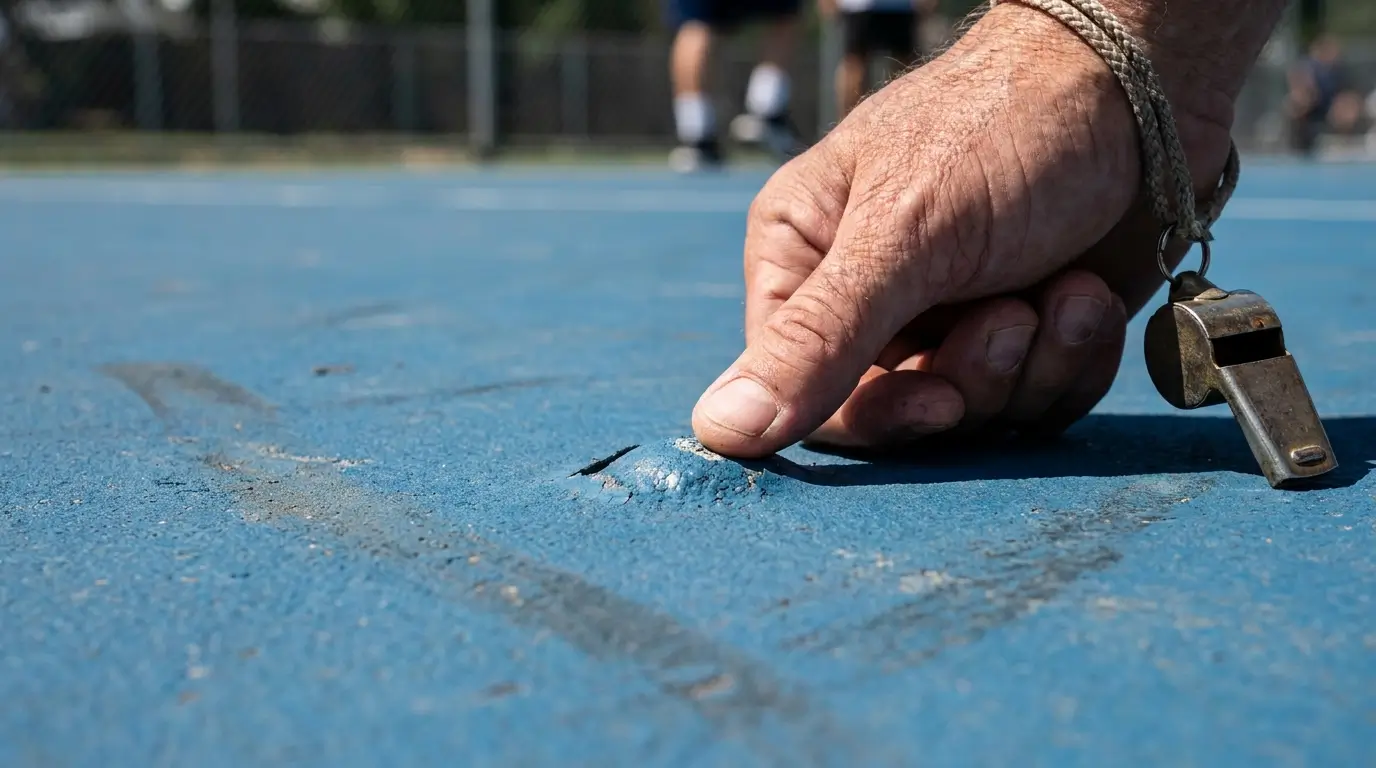
Walk your entire court during the heat of the afternoon (when bubbles are most expanded). Press your foot lightly on the bubbles to see if they are soft and hollow. Use a piece of chalk to circle every blister you intend to fix so you do not miss any small ones once you start working.
Step 2 – Clean and Dry the Surface Thoroughly
Sweep the court to remove all loose dirt, pine needles, and debris. If the court is dirty, wash the marked areas with a mild detergent and water, then let the surface dry completely. You cannot perform this repair on damp pavement.
Step 3 – Carefully Open and Remove Loose Coating at the Bubble
Take a stiff metal putty knife or a paint scraper and pierce the center of the bubble. Carefully scrape away the raised acrylic material. You must continue scraping outward until you hit a section of paint that is tightly bonded to the asphalt. If the paint pulls up easily, keep removing it. You only want to patch against a solid, bonded edge.
Step 4 – Let the Area Dry and Address Moisture If Possible
Once the asphalt or concrete beneath the bubble is exposed, leave it alone for a few hours in the sun. If the exposed pavement looks dark and damp, moisture is actively rising. Let it bake completely dry.
Step 5 – Apply Appropriate Acrylic Patching Compound
Do not use generic concrete patch or driveway filler from a big box store; it will dry too hard and crack. Purchase a dedicated 100% acrylic binder or acrylic patch mix designed for sport surfaces. Apply the patch compound into the scraped-out void using a flat trowel. Smooth it out so it is perfectly level with the surrounding court surface.
Step 6 – Sand, Resurface, and Repaint the Repair Area to Blend In
Allow the patch compound to cure according to the manufacturer’s instructions (usually 24 hours). Take a block of 100-grit sandpaper and lightly feather the edges of your patch so there is no raised lip. Finally, apply matching acrylic court paint over the patch. You may need two coats to match the texture and color of the surrounding court.
When Should You Call a Contractor for Bubbled Court Surfaces?
You should call a professional contractor when bubbles cover large sections of your court, return immediately after a heavy rain, or are accompanied by deep structural cracks and heaving asphalt.
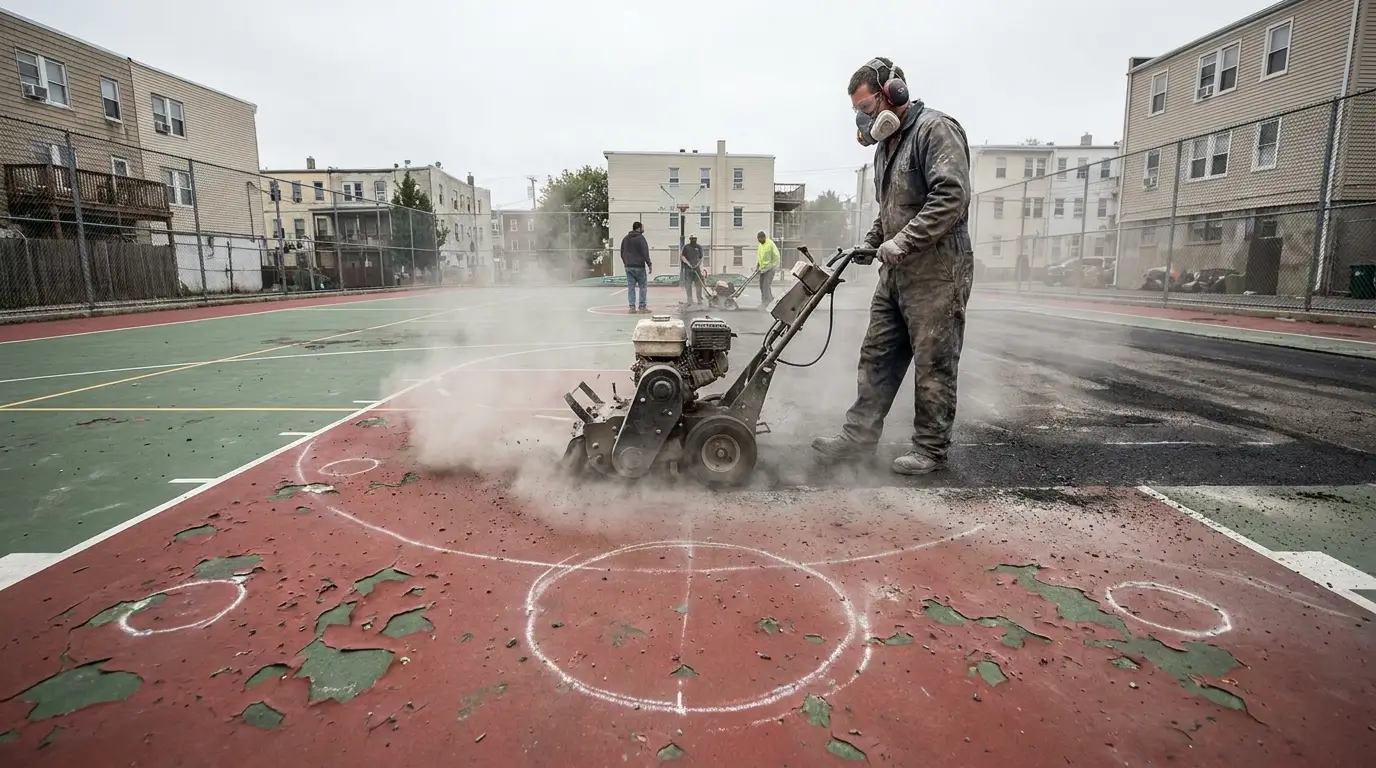
A professional sport surfacing contractor has the tools to diagnose what is happening under the slab. If the acrylic is peeling off in sheets, they will use a walk-behind scarifier or mechanical grinder to completely strip the failed coatings down to the bare asphalt.
Professionals can also address the root causes. They may install advanced acrylic primers designed to block vapor transmission. If the court holds standing water, they can use specialized laser-guided leveling compounds (birdbath patch) to fix the slope of the asphalt before applying new layers of color, ensuring water runs off properly.
Repair vs Resurfacing vs New Court: How to Decide
Knowing when to stop patching and start over is the hardest part of court ownership. As a coach, I tell clients to look at the age of the asphalt.
A standard acrylic surface layer lasts 5 to 8 years before it needs to be recoated. The underlying asphalt slab generally lasts 15 to 20 years before it begins to unravel and oxidize. If your court is 18 years old and covered in bubbles, do not waste money on patching. The asphalt itself is failing.
If you are weighing the financial impact of a full tear-out versus a fresh acrylic overlay, review the typical sport court costs for residential and commercial projects. Understanding the baseline pricing for grinding, paving, and painting will help you set a realistic budget.
If your property has an incredibly high water table and acrylic paint simply will not adhere due to constant ground moisture, you may need to abandon painted asphalt altogether. Check out the best sports court flooring types and costs to see if a suspended modular tile system makes more sense for your specific climate, as tiles allow trapped moisture to breathe and evaporate naturally.
How to Prevent Bubbles in an Acrylic Court Surface
Preventing bubbles requires managing water before it ever touches your court slab.
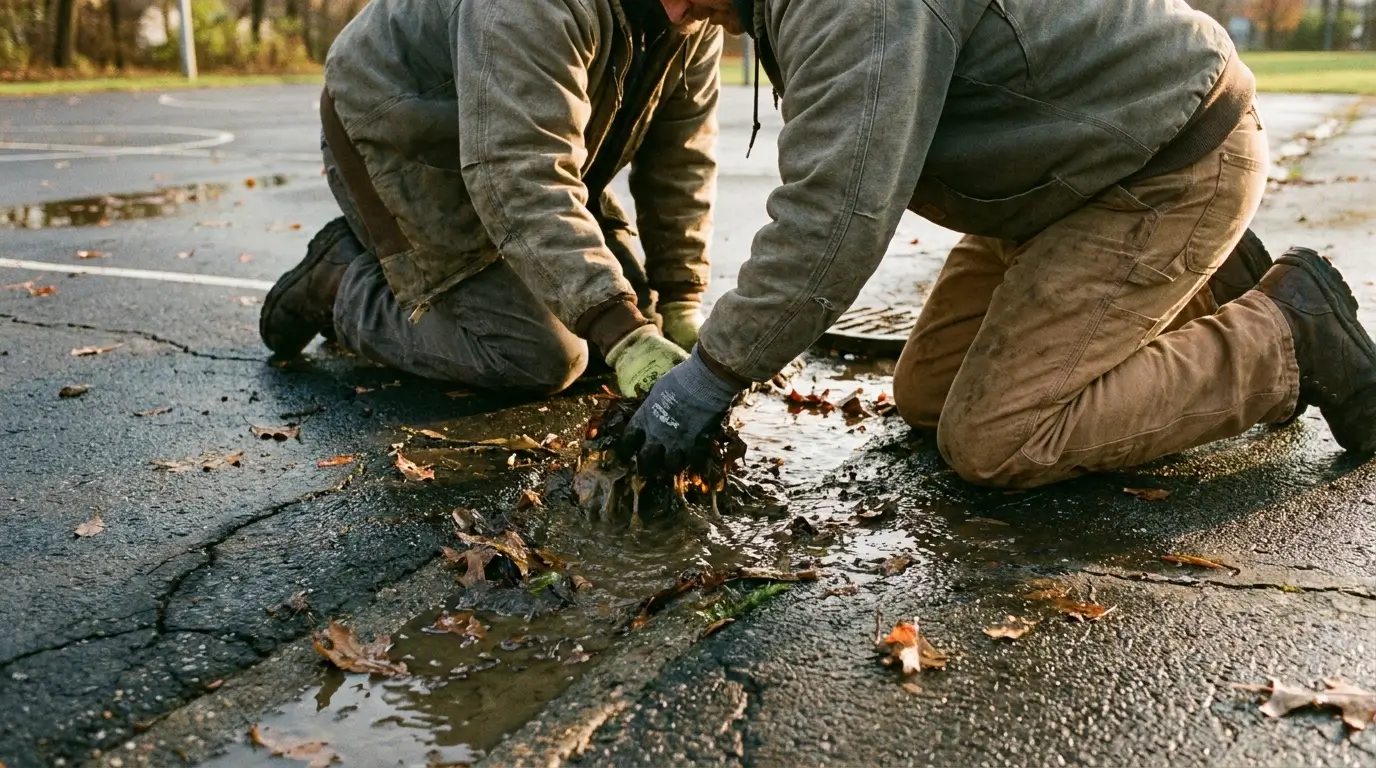
Maintain perimeter drainage: Check the French drains or swales around your court every fall. Clear out wet leaves and mud so rainwater can flow away from the concrete edge.
Adjust landscaping irrigation: Turn on your sprinkler system and watch where the water lands. If heads are spraying the acrylic surface or soaking the dirt directly against the slab, adjust the spray patterns immediately.
Sweep standing water: After a heavy rain, use a wide foam squeegee to push standing water off the court. Allowing puddles to sit under the hot sun forces moisture down into the microscopic pores of the paint.
Use proper vapor barriers: If you are building a new concrete court, ensure your contractor follows strict guidelines on proper vapor barriers and drainage under outdoor courts before pouring the slab.
Coach’s Corner: Real Examples of Bubbled Courts I’ve Seen
I once managed a community tennis court where a massive, two-foot blister kept appearing just behind the baseline. The HOA hired a handyman to cut it out and patch it three years in a row. Every spring, the bubble returned.
When I finally inspected the site, I noticed a large garden bed outside the fence. The irrigation system was leaking underground, constantly feeding water directly under the edge of the asphalt. We dug a small trench, fixed the broken PVC pipe, and patched the court one final time. The bubble never returned. It proved that you cannot fight ground moisture with paint; you have to stop the water at the source.
On another project, a local high school tried to save money by repainting their basketball court four times over a decade without ever mechanically stripping the old layers. The accumulated thickness of the paint became completely inflexible. It trapped years of ground condensation, resulting in massive delamination. Whole sheets of acrylic were sliding under the players’ feet. We had to bring in heavy grinders, strip the court down to bare rock, and start from scratch. Taking a shortcut on prep work always costs more in the end.
FAQ: Fixing Bubbles in Outdoor Acrylic Court Surfaces
What causes bubbles in an outdoor acrylic tennis court surface? Bubbles are primarily caused by hydrostatic pressure. Ground moisture pushes up through the asphalt or concrete slab and turns into vapor under the hot sun, lifting the sealed acrylic paint. Poor drainage, irrigation overspray, and aging adhesives also contribute heavily.
Can you fix acrylic court bubbles without resurfacing the whole court? Yes, if the bubbles are small and isolated. You can carefully scrape away the blistered paint, apply a specialized 100% acrylic patch compound to the bare asphalt, and repaint just the affected area to blend it in.
How do I know if my bubbled court needs a full resurfacing? If your court is over seven years old and has dozens of bubbles, or if widespread delamination returns immediately after every rainstorm, a full resurfacing is necessary. Continuous bubbling means the chemical bond across the entire slab has failed.
Are bubbles in an acrylic court a sign of moisture problems? Almost always. When moisture from heavy rain, snowmelt, or groundwater gets under the slab, it seeks a way out. Because acrylic paint creates a tough, waterproof seal, the vapor gets trapped beneath it and creates a balloon effect.
How much does it cost to repair or resurface a bubbled sport court? A DIY patch job for a few small bubbles costs under $100 in acrylic binder and paint. However, a professional resurfacing to grind off failed coatings and fix widespread bubbling typically ranges from $4,000 to $8,000, depending on the size and condition of the court.
Can I keep playing on a court with surface blisters? It is highly discouraged. Surface blisters create severe dead spots that ruin the ball bounce. Furthermore, if a player makes a hard cut and steps on a raised bubble, the acrylic can break, causing a dangerous slip and fall hazard.
How can I prevent bubbles from coming back after repair? To prevent bubbles from returning, you must eliminate the source of the moisture. Ensure perimeter drains are clear of debris, redirect landscaping sprinklers away from the slab, and clear standing water off the court with a squeegee after a storm.
Final Advice: Don’t Ignore Bubbles on Your Court
Catching surface issues early is the key to affordable court maintenance. If you notice a single blister forming, do not wait for it to spread. Take a weekend to scrape, fill, and patch the area using the DIY steps above, and immediately check your perimeter for any pooling water or drainage issues.
If the bubbling is widespread and the paint is actively peeling away in sheets, accept that the surface has reached the end of its lifespan. Get a quote from a licensed sport surfacing contractor to evaluate the health of your asphalt. Investing in a proper, mechanically prepped resurfacing job ensures your court remains a safe, highly playable asset for the next decade.